

Introduction
Hi everyone, welcome to our new blog post. In this blog, we will explore a long-awaited feature in Salesforce: Record-Triggered Flows on File objects.
Until recently, automating actions when a file was uploaded or deleted required complex Apex triggers. With Spring ’26 update, Salesforce has expanded the power of Flow Builder to include ContentDocument and ContentVersion. This is a massive win for “Clicks Not Code” enthusiasts. It allows us to build robust file automations. We can enforce validation rules and manage file sharing without writing a single line of Apex.
Note: This capability is currently available as a Beta feature in Spring ’26, so it can be tested only in Spring ’26 orgs. It is expected to become Generally Available (GA) in upcoming release
Background — The Old Limitations
Before Spring ’26:
✔ You could build Record-Triggered Flows
✔ You could automate most standard objects
❌ But you couldn’t select ContentDocument or ContentVersion
So if you wanted to automate file uploads, file deletions, file updates — you had to use Apex triggers on ContentDocument/ContentVersion.
What’s New in Spring ’26
Salesforce has now enabled Record-Triggered Flow starting on file objects, specifically:
➡ ContentDocument
➡ ContentVersion
That means your flow can now run when:
✅ A file is uploaded
✅ A file is updated
✅ A file is deleted
And you get the full power of Record-Triggered Flows:
The ability to trigger flows on ContentDocument (the file itself) and ContentVersion (the specific version of a file) opens up several use cases like :
- Preventing File Deletion: Blocking users from deleting important files.
- File Validation: Ensuring files meet specific criteria before they are saved.
- Auto-Sharing: Automatically sharing uploaded files with related records.
Let’s see some the practical use cases examples –
Example 1 — Preventing File Deletion
Let’s say: Your finance team uploads Invoice files to Opportunities. Once an Opportunity is Closed, those invoices must not be deleted for audit and compliance reasons. So, we use a Before Delete Record-Triggered Flow to automatically block deletion — no Apex needed.
🚫 Prevent Invoice File Deletion on Closed Opportunity – Flow Breakdown
This Record-Triggered Flow blocks users from deleting Invoice files linked to Closed Opportunities using Salesforce Flow Builder.
Instead of Apex triggers, we use a Before Delete + Custom Error approach to stop deletion instantly.
Flow Variables –
Let’s dive into each variable to understand their purpose in the flow –
🔹 Primitive Variables
- FilterCount (Number) – This variable stores the count of filtered ContentDocumentLink records related to Opportunity. It helps determine whether the file is attached to any Opportunity before proceeding further.
- OppId (String) – This variable temporarily stores a single Opportunity Id while looping through filtered records. It is used internally during iteration.
🔹 Collection Variables
- OppIds (String Collection) – This collection variable stores all Opportunity Ids linked to the file. It allows us to query multiple Opportunities at once using the IN operator, which improves performance and bulk handling.
🔹 Record / System Variables
- Get_Related_Content_Document_Link – Stores all ContentDocumentLink records related to the file being deleted. This tells us where the file is attached (Opportunity, Case, Account, etc.).
- Filter_Linked_Entity_Type_As_Opportunity – Stores only the links where the parent record is an Opportunity (Id starts with
006). This ensures we process only Opportunity-related records.
- Get_Opportunity_Details – Stores the Opportunity record fetched using OppIds. Used to check whether the Opportunity is Closed.
Flow Steps Explanation –
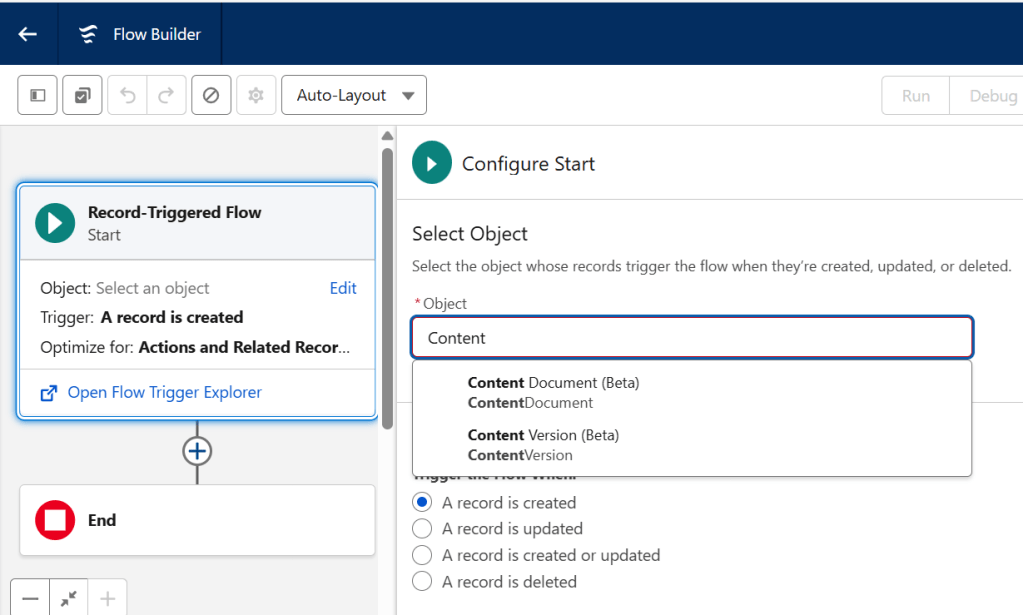
Step 1: Trigger Before File Deletion
The flow starts with:
- Object → ContentDocument
- Trigger → Before Delete
This ensures the logic runs before deletion happens, so we can block it instantly.
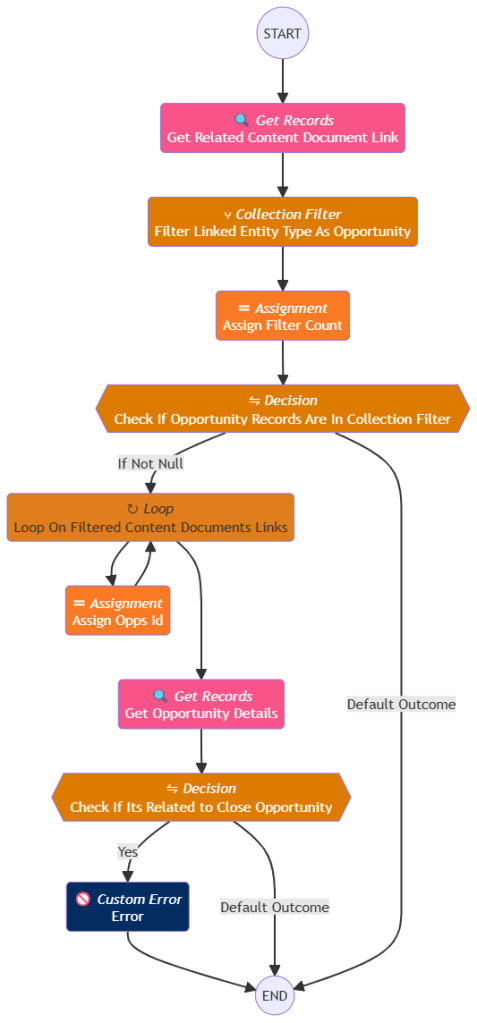
Step 2: Get Related Content Links
The flow fetches all ContentDocumentLink records.
Filter: ContentDocumentId = $Record.Id
This identifies all parent records where the file is attached.
Step 3: Filter Only Opportunity Links
Using a Collection Filter, the flow keeps only: LinkedEntityId STARTS WITH 006
Since Opportunity Ids start with 006, this isolates Opportunity-related files.
Step 4: Assign Filter Count
The flow assigns: FilterCount = Count(filtered links)
This checks whether any Opportunity relationships exist.
If: FilterCount > 0
The flow continues.
Otherwise, deletion is allowed.
Step 5: Loop Through Filtered Links
The flow loops through each filtered ContentDocumentLink.
Inside the loop: Add LinkedEntityId → OppIds collection
This collects all Opportunity Ids.
Step 6: Get Opportunity Details
Using OppIds, the flow queries Opportunity.
Conditions:
Id IN OppIdsIsClosed = TrueThis checks whether any linked Opportunity is closed.
Step 7: Decision – Validate Invoice File
The flow evaluates:
- Opportunity found (closed)
- File Title contains “Invoice”
If TRUE → move to Custom Error
Else → allow deletion
Step 8: Throw Custom Error
The Custom Error element displays:
You cannot remove invoice from a close opportunity.This:
✅ Stops deletion immediately
✅ Shows user-friendly message
✅ No Apex required
✅ Final Outcome
| Scenario | Result |
|---|---|
| Invoice + Closed Opportunity | ❌ Block deletion |
| Non-invoice OR Open Opportunity | ✅ Allow deletion |
Demo –
Example 2 — Preventing Specific File Extension Upload
Let’s say: Your organization allows only PDF or document files for Opportunities. Image files like JPG should not be uploaded to avoid storage misuse and maintain document standards. So, we use a Record-Triggered Flow to automatically block JPG uploads — no Apex required.
🚫 Prevent JPG Upload on Opportunity – Flow Breakdown
This Record-Triggered Flow blocks users from uploading JPG files when the file is attached to an Opportunity using Salesforce Flow Builder.
Instead of Apex triggers, we use an After Save + Custom Error approach to stop invalid uploads instantly.
Flow Variables –
Let’s dive into each variable to understand their purpose in the flow –
🔹 Primitive Variables
- FilterCount (Number) – This variable stores the count of filtered ContentDocumentLink records related to Opportunity. It helps determine whether the uploaded file is attached to an Opportunity before applying validation.
🔹 Record / System Variables
- Get_Related_Content_Document_Link – Stores all ContentDocumentLink records related to the uploaded file. This tells us where the file is attached (Opportunity, Case, Account, etc.).
- Filter_Linked_Entity_Type_As_Opportunity – Stores only the links where the parent record is an Opportunity (Id starts with
006). This ensures the validation runs only for Opportunity uploads.
- $Record.FileType – System variable that stores the uploaded file’s type (PDF, PNG, JPG, etc.). Used to identify and block JPG files.
Flow Steps Explanation –
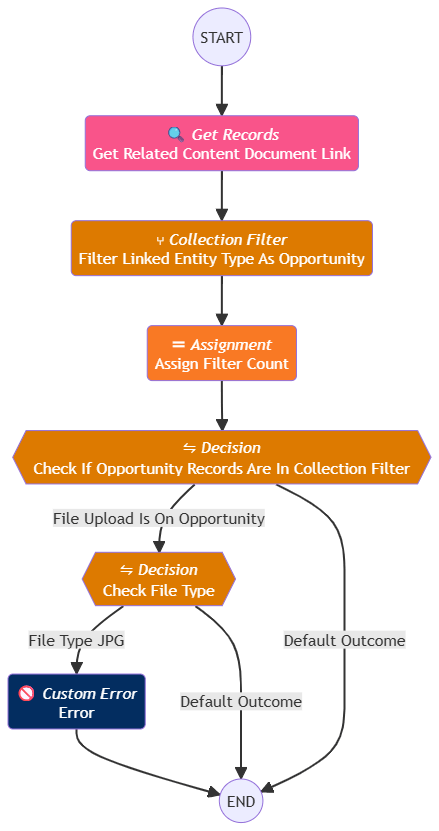
Step 1: Trigger on File Upload
The flow starts with:
- Object → ContentVersion
- Trigger → After Save (Create)
This means the flow runs immediately after a file is uploaded.
Step 2: Get Related Content Links
The flow fetches all ContentDocumentLink records.
Filter: ContentDocumentId = $Record.ContentDocumentId
This identifies where the file is attached.
Step 3: Filter Only Opportunity Links
Using a Collection Filter, the flow keeps only: LinkedEntityId STARTS WITH 006
Since Opportunity Ids start with 006, this isolates Opportunity uploads.
Step 4: Assign Filter Count
The flow assigns: FilterCount = Count(filtered links)
If: FilterCount > 0
It means the file is uploaded on an Opportunity → continue validation.
Otherwise → allow upload.
Step 5: Decision – Check File Type
The flow checks: $Record.FileType = JPG
If TRUE → go to Custom Error
Else → allow upload
Step 6: Throw Custom Error
The Custom Error element displays:
You cannot upload jpg file type.This:
✅ Blocks invalid file
✅ Shows clear message
✅ No Apex required
✅ Final Outcome
| Scenario | Result |
|---|---|
| JPG uploaded on Opportunity | ❌ Block upload |
| PDF/DOC/PNG uploaded | ✅ Allow |
| JPG uploaded elsewhere | ✅ Allow |
Demo –
Flow vs. Apex: When to Still Use Triggers?
While Record-Triggered Flows are now the go-to for most file automation’s, there are still scenarios where Apex Triggers are necessary:
| Use Case | Recommended Tool | Why? |
| Simple Validations | Flow | Fast to build using the Custom Error element. |
| Complex Multi-File Logic | Apex | If you need to process hundreds of files in a single transaction, Apex handles bulkification more efficiently. |
| ContentDocumentLink Trigger | Apex | Currently, you cannot trigger a Flow on the ContentDocumentLink object. |
Best Practices for Record-Triggered Flows on Files
1. Use Before vs After Trigger Thoughtfully
- Before Save flows are optimal when you only need to block or validate data (e.g., prevent certain file uploads or deletions) without performing DML.
- After Save is better when you’re creating related records (like
ContentDocumentLink) or triggering downstream automation.
Choosing the right timing improves performance and avoids unnecessary recursion or extra transactions.
2. Limit Criteria Evaluation Early
- Add simple, specific entry conditions so the flow only executes when truly needed (e.g., only for certain file types or related records).
- Avoid leaving the Start criteria blank unless necessary.
This reduces unnecessary flow executions and improves system performance.
3. Bulk Group DML Operations
- When creating/updating related file links, perform assignments to collections first and use a single Create Records or Update Records element.
- This respects Salesforce governor limits and speeds up execution.
4. Avoid Recursive Looping
- Be careful if your flow updates a file and also triggers on update. Without proper recursion guard logic, the flow could continuously re-trigger itself.
- You can add a custom flag field (or a decision condition like a custom checkbox) to detect when the automation has already processed the record.
5. Test Across All File Scenarios
- Upload new files
- Update existing files
- Version updates
- File deletion
- Files attached via APIs or third-party integrations
Testing these ensures your flow logic holds up in real usage.
6. Prefer Declarative Over Apex (Where Possible)
Although Apex triggers historically handled these needs, flows are now first-class citizens for file automations.
- Keep logic declarative unless you require complex logic that Flow can’t handle (like heavy cross-transaction bulkification).
This reduces maintenance overhead and empowers admin teams.
7. Document Your Flow Logic
Since file automations can affect compliance, auditing, or record completeness, document:
- Why the flow exists
- Entry conditions
- Side effects (e.g., what other records it updates)
- Any recursion prevention method used
Clear documentation helps admins understand & troubleshoot later.
8. Fallback Handling with Fault Paths
- Always implement Fault Paths on your key flow elements so you can capture and log errors gracefully.
- This is especially important in automation affecting high-impact record types like files that could block user activity.
Conclusion
This update represents a huge step forward for Salesforce Admins and Developers alike. By moving file automation into Flow, we reduce technical debt and make our orgs easier to maintain. Whether you are blocking deletions or automating file sharing, the “Starting Object” is the only thing that has changed. The power of Flow remains the same!

Leave a comment