

Lifecycle hooks in Lightning Web Components (LWC) are critical for controlling component behavior during creation, rendering, and destruction. Understanding these hooks ensures efficient resource management, optimal performance, and robust error handling. In this post, we’ll explore each lifecycle hook, provide real-world examples, and discuss their pros, cons, and use cases.
A lifecycle hook is a callback method that triggers at a specific phase of a component instance’s lifecycle.
Table Contents –
Before going in details, lets’ understand what is host element.
What is a Host Element?
The host element is a Custom Element. It is attached to the browser’s DOM, so that your component can be rendered. You can think of this as an input or div type element, except that is a custom Web Component e.g., <my-component>. It also acts as the “container” for your component in the parent’s DOM.
You can access it via this, this.template and this.template.host in your JavaScript, as below –
1. this – Refers to the component instance (JavaScript class). Can be used to access reactive properties, methods, or @api public properties/methods defined in the component’s class.
Example:
export default class MyComponent extends LightningElement {
  myProperty = 'value';

  handleClick() {
    console.log(this.myProperty); // Access component's property
  }
}
2. this.template – Refers to the The component’s shadow root, representing the DOM inside the component’s template.. Used to query or manipulate elements within the component’s shadow DOM.
Example:
<!-- Component Template -->
<template>
  <div data-id="myDiv">Hello</div>
</template>
// Access the div element
renderedCallback() {
  const div = this.template.querySelector('[data-id="myDiv"]');
}
3. this.template.host – Refers to The host DOM element (the custom element itself, e.g., <my-component>). Used to interact with the host element’s attributes e.g., adding a class or retrieving an attribute).
Example:
connectedCallback() {
  // Add a class to the host element
  this.template.host.classList.add('my-class');

  // Get an attribute from the host
  const id = this.template.host.getAttribute('data-id');
}
Types of Life cycles Hooks –
Below are the 5 lifecycle hooks that we have in LWC in Salesforce –
constructor()connectedCallback()renderedCallback()disconnectedCallback()errorCallback(error, stack)
Let’s see them in details –
1. constructor()
The constructor() is the first lifecycle hook to execute. It is called when the LWC component instance is created. This happens before it is added to the DOM.
- Key Points:
- Flows from parent to child i.e. if you have a parent and child component, the constructor() defined in the parent component will fire first.
- Used for initializing private variables.
- The first statement must be
super(). This is because the Lightning Web Component inherits fromLightningElement. It includes its own constructor that should not be skipped during initialization. - Child elements and Public properties (@api) can’t be accessed. This is because they don’t exist yet and are undefined.
- You cannot access or interact with host element and also can’t add properties to host element. This is because the component is not fully loaded in the DOM.
- Avoid
return(other than an earlyreturn;) or usingdocument.write()/open(). - Reference Link for for some more constructor() use case examples – Link
Constructor example Code –
The example LWC showcases the below functionality –
- Initialization of Private Properties
- In the constructor, private properties are initialized with default values. For instance:
countis initialized to0.isLoadingis initialized tofalse.- These initializations ensure the component has well-defined states before interacting with other parts of the application.
- In the constructor, private properties are initialized with default values. For instance:
- Inaccessibility of Public Properties (
@api) in Constructor- Public properties, such as
message, cannot be accessed in the constructor and returnundefined. This limitation exists because public properties are only available after the component’s lifecycle progresses beyond the constructor.
- Public properties, such as
- Inaccessibility of Child Elements in Constructor
- Attempting to access child elements (e.g.,
<lightning-button>) usingthis.template.querySelectorin the constructor results innull. This happens because the DOM is not yet rendered during the constructor phase.
- Attempting to access child elements (e.g.,
- Avoiding DOM Manipulation of Host Elements in Constructor
- Manipulating the DOM or adding attributes to the host element in the constructor is not recommended. For example:
- Adding a CSS class like
child-hostto the host element in the constructor is discouraged. This is because the host element does not exist during this phase.
- Adding a CSS class like
- Manipulating the DOM or adding attributes to the host element in the constructor is not recommended. For example:
| Pros | Cons |
|---|---|
| Allows for early initialization of private variables. | Cannot access child elements or inspect attributes as they are not yet available. |
Ensures prototype chain is correctly set up using super(). | Cannot access public properties (@api) as they are assigned after the constructor. |
| Enables lightweight setup tasks without rendering overhead. | Risk of misusing it for DOM-related tasks, leading to errors. |
| Guarantees a predictable flow from parent to child components. | Limited functionality compared to other hooks (e.g., no DOM interaction). |
2. connectedCallback()
The connectedCallback() lifecycle hook fires when a component is inserted into the DOM.
- Key Points:
- Flows from parent to child i.e. if you have a parent and child component, the connectedCallback() defined in the parent component will fire first.
- To check if a component is connected to the DOM use this.isConnected.
- Can be used for –
- Calling Apex Method.
- Initializing event listeners
- Calling External API using Fetch.
- Calling Navigation service.
- Subscribing and Unsubscribing from a Message Channel.
- Public properties (@api) can be accessed.
- You can access or interact with host element and also add properties to host element, using
this, this.template and this.template.host. - Child elements can’t be accessed. This is because they don’t exist yet and are undefined.
- Can run multiple times, such as when an element is reordered. Add logic to ensure code runs only once if needed.
- Reference Link for for some more connectedCallback() use case examples – Link
Connected Call back example Code –
The example LWC showcases the below functionality –
- Child Component:
- Fetching account data using Apex
- The child component fetches account data. It does this by invoking the
fetchAccountsmethod from theAccountControllerApex class.The results are assigned to theaccountsproperty, which dynamically updates the UI to display account names. Any errors during the data fetch are handled and logged.
- The child component fetches account data. It does this by invoking the
- Assigning a
clickevent listener to the host element- In the
connectedCallbackmethod, the child component adds a “click” event listener to its host element using theaddEventListenermethod. This listener is defined as thehandleHostClickmethod. It dispatches a custom event calledhostclickwhenever the host element is clicked.
- In the
- Setting attributes like CSS classes and custom attributes to the host element
- The child component modifies the host element by:
- Adding a CSS class
child-hostto apply specific styles. - Setting a custom data attribute “custom_attr” with the value “Data from child”.
- These modifications allow the parent component to apply and detect specific styles or values.
- Adding a CSS class
- The child component modifies the host element by:
- Demonstrating that child elements (like the
<h1>element) cannot be accessed- Attempts to access the
<h1>element within the child component during theconnectedCallbacklifecycle hook result inundefined. This is because they don’t exist yet in the DOM.
- Attempts to access the
- Demonstrating that public properties (
valuePassedFromParentUsingProperty) can be accessed- Trying to access the public property valuePassedFromParentUsingProperty results in values. This is because all the public properties (decorated with
@api) are received from the parent component.
- Trying to access the public property valuePassedFromParentUsingProperty results in values. This is because all the public properties (decorated with
- Fetching account data using Apex
- Parent Component:
- The parent component includes a element and binds a hostclick event handler (handleHostClick). When the child’s host element is clicked, the parent component updates the parentValue property. It updates this property with data from the child element’s custom attribute (custom_attr).


| Pros | Cons |
|---|---|
| Ideal for initializing tasks like data fetching and setting up listeners. | Overuse can lead to performance bottlenecks if the hook is fired multiple times (e.g., during re-insertion). |
| Executes after all public properties are assigned. | Not suited for reactive property updates—use a setter instead. |
| Handles dynamic updates like subscribing to message channels. | Adding heavy computations here can delay rendering |
| Allows interaction with parent elements and external systems. | Can’t access child elements, as they are not yet in the DOM. |
3. renderedCallback()
The renderedCallback() lifecycle hook fires after the component renders or re-renders into the DOM.
- Key Points:
- Flows from child to parent component i.e. if you have a parent and child component, the renderedCallback() defined in the child component will fire first.
renderedCallback()runs multiple times, as a component is usually rendered many times during the lifespan of an application. To avoid repeated execution, use a boolean flag (e.g.,isRendered) to track ifrenderedCallback()has already executed.- Can be used for below, but make sure to use guard logic using boolean flag to guarantee a one-time run of renderedCallback()-
- Loading custom CSS style from static resources.
- Loading external scripts from static resources.
- Calling Apex Method
- Calling External API using Fetch.
- Calling Navigation service.
- Adding event listeners.
- Perform logic after a component has finished rendering. This is useful for tasks related to UI interaction. Examples include computing node sizing or adding event listeners.
- Avoid updating component state (e.g., @track or public properties) within
renderedCallback(), as it can lead to infinite rendering loops.Instead, use getters and setters for reactive changes. - Child elements can be accessed using
this.template.querySelector()andthis.template.querySelectorAll(). - Event listeners added in
renderedCallbackwon’t duplicate, as browsers ignore identical listeners. However, it’s best practice to remove them indisconnectedCallbackto avoid potential memory leaks. - Reference Link for for some more renderedCallback() use case examples – Link
Rendered Call back example Code –
- Rendered Call Back Ex LWC component shows example of below functionalities –
- Avoid repeated execution of renderedCallback():
- Usage of boolean property “hasRendered” to run renderedCallback() only one time.
- Loading Custom Style From Static Resource Load Style ‘lightning/platformResourceLoader’:
- Loading custom style from static resources and adding custom style on “sample button” after component has rendered.
- Adding Dynamic Event Listner After The Component is Rendered:
- Adding “click” event listener to “sample button” dyamically in js.
- Avoid repeated execution of renderedCallback():
| Pros | Cons |
|---|---|
| Ensures the DOM is fully rendered, making it ideal for DOM manipulations. | Updating reactive properties here can cause infinite loops. |
| Perfect for initializing third-party libraries that rely on DOM elements. | Can fire multiple times, requiring careful handling to prevent redundant operations. |
Allows one-time tasks using flags (e.g., hasRendered boolean). | Poor design can lead to unnecessary re-render cycles, affecting performance. |
| Supports dynamic behaviors like measuring or modifying DOM content. | Not suitable for heavy logic that impacts rendering performance. |
4. disconnectedCallback()
The disconnectedCallback() lifecycle hook fires when the component is removed from the DOM.
- Key Points:
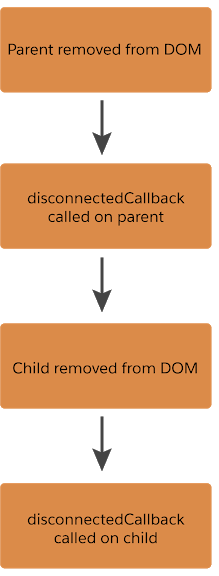
- Flows from child to parent component i.e. if parent and child component are removed, the disconnectedCallback() defined in the child component will fire first.
- Can be used to clean up work done in the
connectedCallback()like –- Cleaning up event listeners to prevent memory leaks.
- Unsubscribing from message channel.
- Removing or resetting timers such as setTimeout or setInterval.
- Disconnecting observers like MutationObserver or IntersectionObserver.
- Releasing references to DOM elements or data bindings.
- Purging caches
- Important to release resources: Ensures efficient memory usage and prevents unintended behavior in the application
- Runs once for each component removal: Executes each time the component is removed from the DOM. Add logic to avoid redundant cleanup if necessary.
Disconnected Call Back Example Code –
The example LWC showcases the below functionality –
- Child Component: Shows the below examples in disconnectedCallback():
- Setting up an interval and event listener
- The child component adds a click event listener to its host element. When clicked, it triggers the handleHostClick method, which dispatches a custom event named hostclick.
- In the connectedCallback lifecycle hook, an interval is created using setInterval, which logs a message to the console every second. This simulates a recurring task.
- Handling resource cleanup in disconnectedCallback()
- Interval Cleanup: When the child component is removed from the DOM, the disconnectedCallback lifecycle hook clears the interval. It uses clearInterval to prevent memory leaks.
- Event Listener Removal: The click event listener is removed from the host element. This ensures no residual listeners remain after the component is disconnected.
- Setting up an interval and event listener
- Parent component
- The parent component toggles the visibility of the child component using the show property. The element is conditionally rendered based on this property using the <template if:true> directive.
- A button in the parent component toggles the show property. This allows users to dynamically add or remove the child component from the DOM.
| Pros | Cons |
|---|---|
| Essential for cleanup tasks like removing event listeners or caches. | Can be overlooked, leading to memory leaks or orphaned resources. |
| Helps maintain performance in long-lived applications. | May not always fire in cases of abrupt application terminations (e.g., browser crash). |
Complements connectedCallback() for resource management symmetry. | Mismanagement of cleanup logic can lead to unintended behavior when components are reconnected. |
5. errorCallback(error, stack)
The errorCallback() lifecycle hook acts as an error boundary for uncaught exceptions in descendant components or template event handlers.It is invoked when the component throws error in one of the lifecycle hooks (instantiating the component, connecting or rendering).
- Key Points:
- Similar to JavaScript catch{} block, has two parameters.
erroris the thrown error object.stackis a string indicating the component path (e.g.,<c-parent> <c-child>).
- Triggered if a descendant component (child or nested child) in the same DOM tree throws an error during the rendering or lifecycle phases
- To capture the stack information and render a different template when error is occurred.
- Can be used for:
- Logging errors for debugging or monitoring purposes.
- Displaying user-friendly error messages.
- Preventing the error from propagating further in the component hierarchy.
- Sending error details to external logging services.
- Handles errors only for child components within the current component’s DOM subtree.
- Does not catch all errors like Errors thrown asynchronously (e.g., in a
setTimeout) or errors outside the component tree, like global event handlers
- Similar to JavaScript catch{} block, has two parameters.
Error Call back example Code –
The example LWC showcases the below functionality –
- Before
errorCallback() in Parent Component – Let’s suppose we have an error in the child component. This occurs due to the child component setting a custom property to the host element. If the parent component doesn’t have anerrorCallback(), the child component will not display on the UI. An error message will be displayed as. –

errorCallBackChildLwc.html
<template>
    <div style="padding: 1rem;">
        <p>Child Component</p>
    </div>
</template>
errorCallBackChildLwc.js
import { LightningElement } from 'lwc';

export default class ErrorCallBackChildLwc extends LightningElement {

    connectedCallback() {
        // Access the host element
        const host = this.template.host;

        // Set a custom data attribute on the host element
        this.template.dataset.custom = "Data from child using custom attributes";
    }
}
errorCallBackParentLwc.html
<template>
    <lightning-card title="Error Call Back Example - LWC">
        <div style="padding: 1rem;">
            <p>Parent Component</p>
            <c-error-call-back-child-lwc onhostclick={handleHostClick}></c-error-call-back-child-lwc>
        </div>
    </lightning-card>
</template>
errorCallBackParentLwc.js
import { LightningElement } from 'lwc';

export default class ErrorCallBackParentLwc extends LightningElement {
}
- After
errorCallback() in Parent Component – The error in the child component is handled in the parent component’s errorCallback(). The child component will be rendered on UI.
import { LightningElement } from 'lwc';

export default class ErrorCallBackParentLwc extends LightningElement {

    errorCallback(error, stack){
        console.log('Parent error callback called, error = ' + error + ', stack = ' + stack);
    }
}

| Pros | Cons |
|---|---|
| Acts as an error boundary, capturing unhandled errors in descendant components. | Only catches errors from template handlers or lifecycle hooks—not programmatically attached events. |
| Provides error and stack trace details for debugging. | Must be implemented thoughtfully to avoid exposing sensitive error information in logs or UI. |
| Allows graceful degradation of UI by rendering alternative views. | Relies on manual implementation to wrap components—may be inconsistent if not uniformly applied. |
| Prevents crashes by catching exceptions and preserving application stability. | Can add complexity when handling deeply nested component hierarchies. |
LWC Lifecycle Flow –
Lightning web components have a lifecycle managed by the framework. The framework creates components, inserts them into the DOM, renders them, and removes them from the DOM. It also monitors components for property changes.
The below diagram shows the flow of the component lifecycle from creation through render.

The below diagram shows what happens when a component instance is removed from the DOM.

Leave a comment