

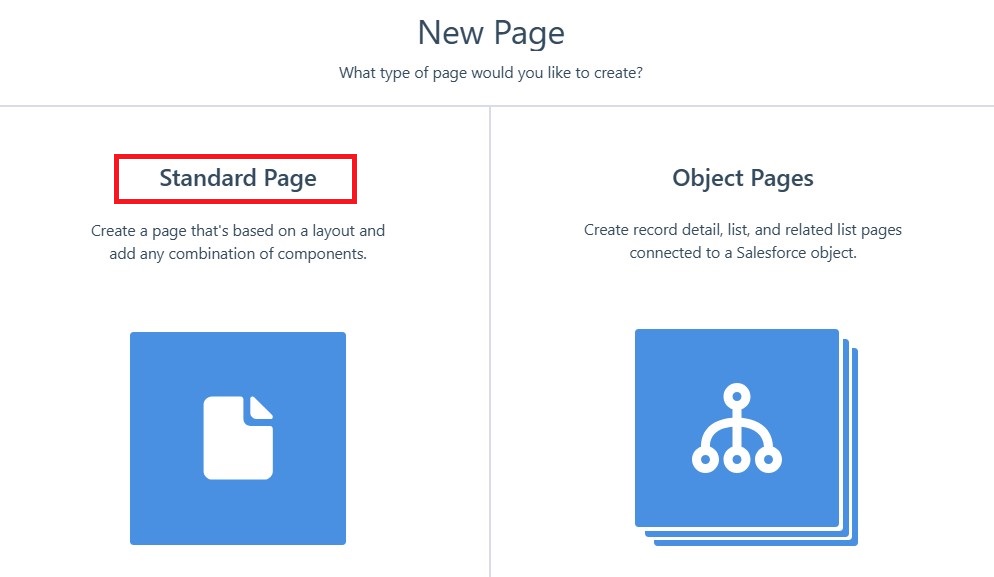
Introduction :
In continuation to our previous blog post Calling Lightning Web Components (LWC) with Selected Record IDs from List Views in Salesforce Lightning Experience (LEX), let’s see in this blog post Calling LWC from list views in experience cloud with selected record ids in salesforce.
Our earlier blog mentions approaches that do not work in Experience Cloud because, according to Salesforce documentation, Experience Cloud does not support Visualforce buttons.

To achieve the desired functionality, we propose an alternative method: utilizing Visualforce Pages invoked from an Aura Component to process records in an LWC embedded on a Community Page.
Using Visualforce Pages Invoked from a Aura Component And Processing Records In LWC called on a Community Page
Overview:
This strategy involves embedding a VF page within an Aura component placed on the standard lead list view in a community. The VF page acts as an intermediary, capturing selected record IDs and passing them to an LWC for processing.
Example Use Case of Calling LWC from list views in experience cloud :
Let’s consider a scenario where the requirement is to bulk-update lead details for selected records based on community user input. This can be achieved by creating a VF page that generates a dynamic “Update Leads” button on the standard lead list page in the community. The VF page, embedded in an Aura component, captures selected record IDs and redirects to a community page containing the LWC for editing the records.
Below is an explanation of the process:
- User Interaction on the List View:
The community user selects records from the lead list view and clicks the “Update Leads” button on the VF page. - Capturing Selected Records:
The VF page retrieves the selected record IDs and redirects to the “Update Leads” community page. - Processing Records in LWC:
On the community page, an LWC (updateMultipleLeads) is invoked. The selected record IDs are passed as query parameters in the URL from VF Page. This LWC processes the selected records and displays them for editing. .
By embedding the VF page within an Aura component and combining it with an LWC, this method provides a seamless solution for bulk record updates in a Salesforce community.
Demo –
Let’s see the step-by-step implementation of this solution –
Step 1 – Create Update Multiple Leads LWC like below :
updateMultipleLeads.html
<template>
<!-- Main card to hold the content -->
<lightning-card title="Mass Update Leads" icon-name="standard:lead">
<!-- Conditionally render the form only if valid leads exist -->
<template lwc:if={validLeadExists}>
<div class="slds-p-around_medium">
<!-- Iterate over the list of lead IDs and render forms for each -->
<template for:each={leadIds} for:item="leadId">
<div class="slds-m-around_medium" key={leadId}>
<!-- Lightning record edit form for updating a lead record -->
<lightning-record-edit-form object-api-name="Lead" record-id={leadId} data-id={leadId}>
<!-- Layout container for fields -->
<lightning-layout multiple-rows>
<!-- Layout item for First Name field -->
<lightning-layout-item size="12" large-device-size="2" padding="around-small">
<lightning-input-field field-name="FirstName" variant="label-stacked" required>
</lightning-input-field>
</lightning-layout-item>
<!-- Layout item for Last Name field -->
<lightning-layout-item size="12" large-device-size="2" padding="around-small">
<lightning-input-field field-name="LastName" variant="label-stacked" required>
</lightning-input-field>
</lightning-layout-item>
<!-- Layout item for Mobile Phone field -->
<lightning-layout-item size="12" large-device-size="2" padding="around-small">
<lightning-input-field field-name="Company" variant="label-stacked" required>
</lightning-input-field>
</lightning-layout-item>
<!-- Container for displaying error or success messages -->
<lightning-layout-item size="12" large-device-size="2" padding="around-small">
<lightning-messages> </lightning-messages>
</lightning-layout-item>
</lightning-layout>
</lightning-record-edit-form>
</div>
</template>
<!-- Buttons for Cancel and Update All actions -->
<div style="text-align: center;">
<!-- Cancel button to navigate back to the list view -->
<lightning-button class="slds-m-top_medium" label="Cancel" variant="brand"
onclick={redirectToListView}></lightning-button>
<!-- Update All button to submit all forms -->
<lightning-button class="slds-m-top_medium" label="Update All" variant="brand"
onclick={handleUpdateAll}></lightning-button>
</div>
</div>
</template>
<!-- Render message and button if no valid lead are found -->
<template lwc:else>
<!-- Display no eligible records message -->
No eligible records.
<div style="text-align: center;">
<!-- Button to return to the list view -->
<lightning-button class="slds-m-top_medium" label="Return to list view" variant="brand"
onclick={redirectToListView}></lightning-button>
</div>
</template>
</lightning-card>
</template>
updateMultipleLeads.js
// Import necessary modules and mixins
import { LightningElement, wire } from "lwc";
// Provides access to the current page's state
import { CurrentPageReference } from "lightning/navigation";
// Used for showing toast notifications
import { ShowToastEvent } from "lightning/platformShowToastEvent";
// NavigationMixin to enable navigation in Salesforce Lightning
import { NavigationMixin } from "lightning/navigation";

export default class UpdateMultipleLeads extends NavigationMixin(LightningElement) {

    // Holds the array of selected lead record IDs
    leadIds = [];
    // Boolean to check if valid leads exist
    validLeadExists;

    // Wire method to get current page state parameters
    @wire(CurrentPageReference)
    getStateParameters(currentPageReference) {
        if (currentPageReference) {
            // Extract record IDs passed as state parameter
            const recordIds = currentPageReference.state.c__recordIds;
            // Check if there are valid leads
            this.validLeadExists = recordIds?.length > 0;
            if (recordIds) {
                // Decode and split record IDs into an array
                this.leadIds = decodeURIComponent(recordIds).split(",");
            }
        }
    }

    /**
     * Utility method to show toast notifications
     * @param {string} title - Title of the toast
     * @param {string} message - Message body of the toast
     * @param {string} variant - Type of toast (success, error, warning)
     */
    showToast(title, message, variant) {
        const evt = new ShowToastEvent({
            title,
            message,
            variant,
        });
        // Dispatch the toast event
        this.dispatchEvent(evt);
    }

    /**
     * Redirects user to the Lead list view
     */
    redirectToListView() {
        this[NavigationMixin.Navigate]({
            // Standard navigation type
            type: "standard__objectPage",
            attributes: {
                // Redirect to Lead object
                objectApiName: "Lead",
                // Go to list view
                actionName: "list",
                state: {
                    // Apply Recent filter in the list view
                    filterName: "Recent",
                },
            },
        });
    }

    /**
     * Handles the submission of updates for multiple lead records
     */
    handleUpdateAll() {
        debugger;
        // Select all record-edit forms
        const forms = this.template.querySelectorAll("lightning-record-edit-form");
        // Array to hold promises for form submissions
        const updatePromises = [];

        // Iterate over each form and create a Promise for its submission
        forms.forEach((form) => {
            const promise = new Promise((resolve, reject) => {
                // Resolve on success
                form.addEventListener("success", () => resolve());
                // Reject on error with message
                form.addEventListener("error", (event) => reject(event.detail.message));
                // Submit the form
                form.submit();
            });
            updatePromises.push(promise); // Add the promise to the array
        });

        // Wait for all forms to complete submission (success or failure)
        Promise.allSettled(updatePromises).then((results) => {
            const errors = results
                // Filter out rejected promises
                .filter((result) => result.status === "rejected")
                // Collect error messages
                .map((result) => result.reason);

            // Count successful updates
            const successCount = results.filter((result) => result.status === "fulfilled").length;

            if (errors.length > 0) {
                // Show a partial success toast if there are errors
                this.showToast(
                    "Partial Success",
                    `Updated ${successCount} leads. Errors occurred: ${errors.join(", ")}`,
                    "warning"
                );
            } else {
                // Show a success toast if all updates succeed
                this.showToast("Success", "All leads updated successfully!", "success");
                // Redirect to the lead list view
                this.redirectToListView();
            }
        });
    }
}
updateMultipleLeads.js-meta.xml
<?xml version="1.0" encoding="UTF-8"?>
<LightningComponentBundle xmlns="http://soap.sforce.com/2006/04/metadata">
    <apiVersion>62.0</apiVersion>
    <isExposed>true</isExposed>
    <targets>
        <target>lightning__AppPage</target>
        <target>lightning__RecordPage</target>
        <target>lightning__HomePage</target>
        <target>lightningCommunity__Page</target>
        <target>lightningCommunity__Default</target>
        <target>lightning__UrlAddressable</target>
    </targets>
</LightningComponentBundle>
Step 2 – Create the VF Page :
Create the MassUpdateLeadsFromCommunities_VF as below –
MassUpdateLeadsFromCommunities_VF.page
<!--
Visualforce Page: MassUpdateLeadsFromCommunitiesPage
Purpose:
This Visualforce page is designed to provide functionality for bulk-updating lead records
from a community list view. It dynamically adds a button ("Update Leads") to the standard
list view, allowing users to select multiple lead records and redirect them to a community page
for further processing using a Lightning Web Component (LWC).
Key Features:
1. Dynamically adds the "Update Leads" button to the list view's button group.
2. Captures the selected lead record IDs from the list view.
3. Constructs a community URL with the selected record IDs as query parameters.
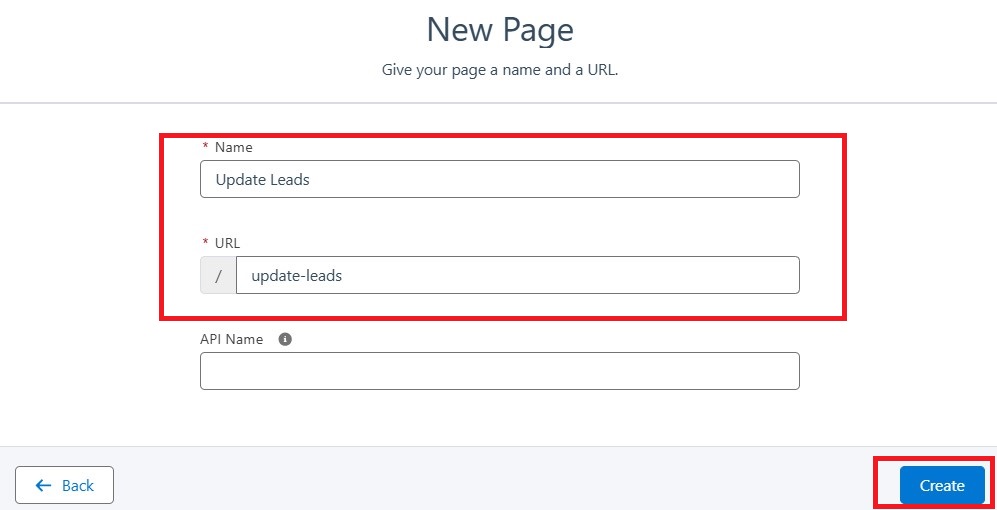
4. Redirects users to the community page (`/s/update-leads`) to process the selected records
using the `updateMultipleLeads` LWC.
Notes:
- This page interacts with the parent document (list view) to retrieve selected records.
- Only lead records (IDs starting with "00Q") are processed.
- Ensures no duplicate IDs are sent by using a JavaScript `Set`.
- Includes error handling to alert users if no records are selected or if redirection fails.
-->
<apex:page showHeader="false" sidebar="false">
<script>
// Initialize an array to store selected lead IDs
var selectedLeadIds = [];
// Function to handle the button click event
function btnClicked() {
// Clear the array to avoid duplicate IDs from previous selections
selectedLeadIds = [];
var elements = parent.document.getElementsByClassName("selected"); // Get all selected rows
// Iterate through the selected elements to extract record IDs
for (var i = 0; i < elements.length; i++) {
// Get links within each selected row
var links = elements[i].getElementsByClassName('outputLookupLink');
for (var j = 0; j < links.length; j++) {
var link = links[j];
// Extract the record ID from the link
var recordId = link.getAttribute('data-recordid');
// Check if it's a lead ID (starts with "00Q")
if (recordId && recordId.startsWith("00Q")) {
// Add the ID to the array
selectedLeadIds.push(recordId);
}
}
}
// Remove duplicate IDs by using a Set
var setLeadIds = new Set(selectedLeadIds);
const arrLeadIds = Array.from(setLeadIds);
// Debugging log to verify selected lead IDs
console.log("Selected Lead IDs: ", arrLeadIds);
// Redirect to the community page with the selected lead IDs
if (arrLeadIds.length > 0) {
redirectToCommunity(arrLeadIds);
} else {
alert("No leads selected."); // Alert if no leads are selected
}
}
// Function to construct the community URL and redirect
function redirectToCommunity(leadIds) {
// Define the base URL for the community page
var baseUrl = '/testpartnerportal/s/update-leads?';
// Construct query parameters using the selected lead IDs
var queryParams = 'c__recordIds=' + leadIds.join(',');
// Combine base URL and query parameters
var redirectUrl = baseUrl + queryParams;
// Debugging log to verify the redirect URL
console.log("Redirecting to: ", redirectUrl);
// Redirect to the constructed URL
if (window.top) {
// Redirect in the top-level window
window.top.location.href = redirectUrl;
} else {
// Alert if redirection fails
alert("Unable to redirect. Please check your configuration.");
}
}
// Function to dynamically add the "Update Leads" button to the UI
function addButton() {
debugger;
// Create a new list item element
var li = document.createElement("li");
// Create a button element
var button = document.createElement("button");
// Set button label
button.innerHTML = "Update Leads";
// Add Salesforce Lightning styling
button.className += " slds-button slds-button--neutral";
// Assign the click event handler to the button
button.onclick = btnClicked;
// Add the button to the list item
li.appendChild(button);
// Locate the button group in the parent document and append the new button
var buttonGroup = parent.document.getElementsByClassName('slds-button-group')[0];
if (buttonGroup) {
// Add the button to the group
buttonGroup.appendChild(li);
}
}
// Add the button to the page after it loads
window.onload = function() {
// Add button with a slight delay to ensure the DOM is fully loaded
setTimeout(addButton, 1000);
};
</script>
</apex:page>
Step 3 – Create the DynamicListButton Aura Component :
DynamicListButton.cmp
<pre class="wp-block-syntaxhighlighter-code"><aura:component implements="flexipage:availableForAllPageTypes,forceCommunity:availableForAllPageTypes" access="global">
    <aura:attribute name="iframeUrl" type="String" />
    <aura:handler name="init" value="{!this}" action="{!c.doInit}" />
    <!-- Dynamically set the iframe src attribute -->
    <a href="http://!v.iframeUrl">http://!v.iframeUrl</a>
</aura:component></pre>
DynamicListButtonController.js
({
    doInit: function (component, event, helper) {
        // Get the current window URL
        let urlString = window.location.href;

        // Extract the base URL before "/s"
        let baseURL = urlString.substring(0, urlString.indexOf("/s"));

        // Construct the dynamic iframe URL
        let iframeUrl = `${baseURL}/apex/MassUpdateLeadsFromCommunities_VF`;

        // Set the iframe URL to the component's attribute
        component.set("v.iframeUrl", iframeUrl);
    }
});
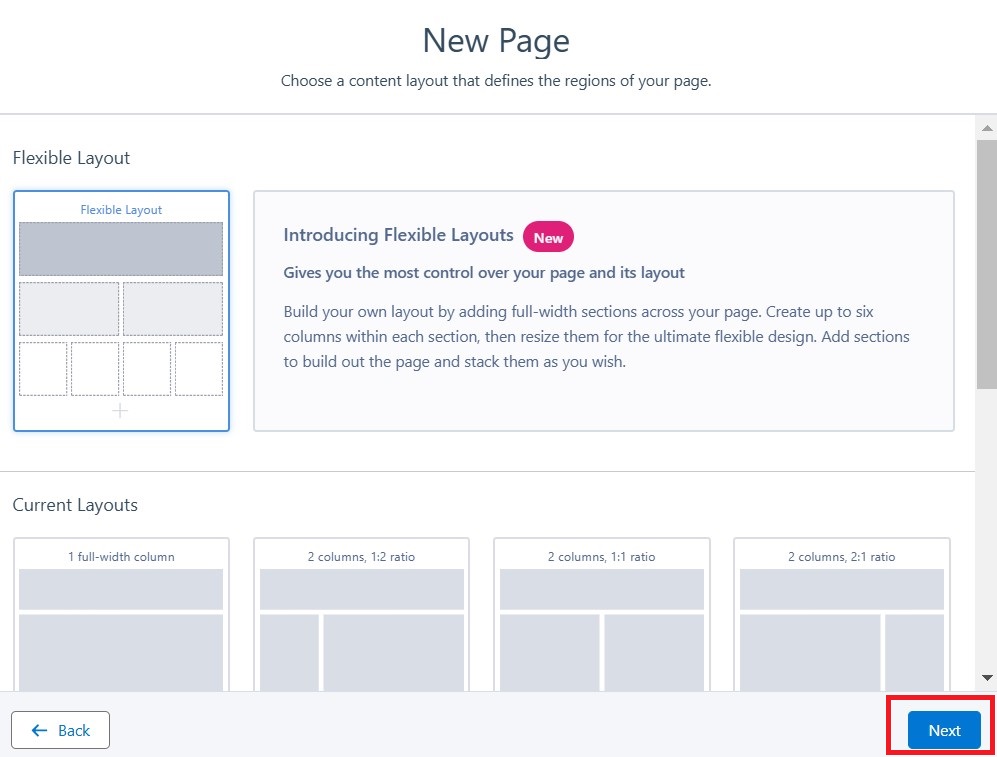
Step 4 – Create the Update Leads Community Page and add updateMultipleLeads LWC :


Step 5 – Create the Leads List community page if not there and add the DynamicListButton Aura Component :


Note –
- Make sure to add the VF page access to community user profile.
- Pin a single list view for community users, as this dynamic list view button only appears on page load. If you change the list view, the button will disappear from the UI.
- We have used a partner portal for this example, but it should also work for customer portal.

Leave a comment